Project management using Notion.
By Cyril on April 13, 2020
Table of content
🧰 Notion, my favorite tool
I discovered Notion about a year ago and I cannot find any better tool to handle most of my digital life in one product. It is flexible so I can use it to track my goals or the habits I want to implement such as reading 2 books a month. I also gather my learnings regarding different subjects or track my savings to have a global view; like the percentage in each kind of savings (bonds, stock options, crypto, etc).
My biggest motivation is that I use Notion and only Notion for many different things. No more Asana, Trello or Jira, no Evernote, no Google apps (Keep, Tasks, Calendar) for my professional life and most of my personal life as well (even though I would still put an appointment to the hairdresser using Google Assistant 🤫).
In this post, I want to give a brief introduction about how I am using Notion to manage my projects and daily tasks. You can find a template of my workflow following the link and duplicate it for your own use if you like it (see the “Duplicate” button on the top right corner).
🗂 Project management
To handle planning and administrative tasks such as generating quotations and invoices, we need 3 tables that are going to be linked to each other. Let’s start with the customers as they are the source of the new tasks that will soon fill your life.
Customers
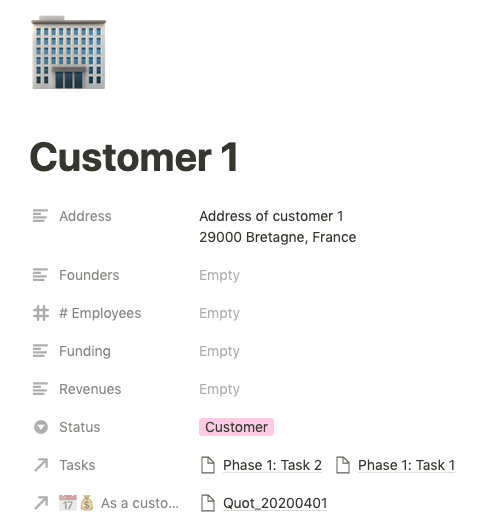
My activity is centered around the customers. I created a table to list all of them and add a description that can be helpful during the missions to meet their expectations. For the sake of that article, I am going to use the example that can be seen on the Notion page I shared. All the data is fake as you will quickly guess.
Here is an example showing the different fields I created to define my customers. You should add or remove some if you would like. The address is used in other tables but all the other fields are purely informational.
- Address: postal address of the company (probably the headquarters if you want to send an invoice).
- Founders: it’s always better to know the founders behind the company you are working for. My ideal customers are startups so I feel this piece of information is important to me. One could link it to a Notion account changing the field type to “Person”. Another great solution I might consider for myself shortly would be to have another table to store Contact information such as e-mail, phone number, etc, and link it directly there.
- Employees count: to grasp an idea about the structure.
- Funding: how is the company scaling, if they intend to?
- Revenues: nature, amount or anything that can give you an idea about the amount of money the company is dealing with. This field is a text block so you can put any details you care about.
- Status: I didn’t tell you that I also use that table to list prospects. Here I can choose between customers and prospects. Doing this provides 2 different views to filter “customers” and “potential customers”, or simply “contacts” if I feel the need to add a third status.
The last two lines are links to the tasks they are involved with and the documents (quotation/invoice) where they are mentioned. Let’s dive into how the tasks are handled in my customer project manager.
As a side note: as you will see later, having you as a customer is the best way to remember to treat you like a customer. You will soon add tasks where you are your own customer, be sure to treat them with the same level of importance as other tasks.
Tasks
Now that we have created a table with the customers, we can create one with the tasks those customers are going to make you create.
I made a few different views to better appreciate the work to be done. The flexibility of Notion makes it perfect to adapt the databases or the views to everyone’s own needs. I am going to introduce how I did implement the tasks for myself.
Definition of a task
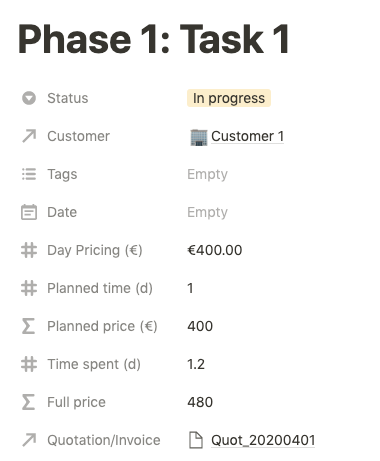
Let’s go through the different fields defining a task. All those fields have a different role and they are all useful to have a clear understanding of the work to be done:
- Status: the simplest way to give a status to a task is to have the three states: “Not started”, “In Progress”, “Done”. In order to work on future quotations, I also added the “Draft” state. Those are tasks I am currently trying to define or that are waiting for customer approval.
- Customer: that field is taken from the Customer database we created before. It’s really easy to find the right customer by typing the first letters when adding the customer.
- Tags: At the moment, I use tags only for the tasks I attribute to myself. Those tags are “Admin” for administrative tasks, “Personal Branding” where tagged tasks can be “modifying the website” or “working on a better SEO”. The last one is “Prospection” for tasks relative to talking to future customers, meeting people, etc.
- Date: it’s important to plan and set deadlines. The date field in Notion can have a start and end date, as well as time during the day, making it perfect for time tracking.
- Day pricing: as you guess, how much do I make my customer pay on a daily basis for my time spent on that task.
- Planned time: number of days planned to achieve the task. It can be a floating-point if only a few hours. To me, one day is 8 hours.
- Planned price: for that field, a formula is being used:
day pricing * planned time. No need for the user to fill it. - Time spent: time effectively spent on the task. I make my customers pay the price if I spend more or less time on the task.
- Full price: price to pay. Same as “Planned price”, this field is automatically updated.
- Quotation/Invoice: link to the quotation or invoice, depending on the status of the document at that point. Read on to see how those documents are generated in my workflow.
Notion lets you create templates to add lines with pre-filled data. I created one for my biggest customers so that the company and daily price is filled in advance but also for the tasks I attribute to myself.
Now that we have tasks with enough fields to sort and filter them, we have everything for good planning.
Several views for good planning
Notion lets you watch the tasks using a few different views: Table, List, Calendar, Kanban and Gallery. Those views are very useful once they are used correctly.
As an example, let’s say I want to view all the tasks I have to accomplish during the week, I can use the date field above and filter out all the tasks that are not due in the week to follow. Moreover, why wouldn’t I keep the past tasks that are not “Done”? That view would also sort the tasks by the due date or the status to highlight the next tasks I have to execute.
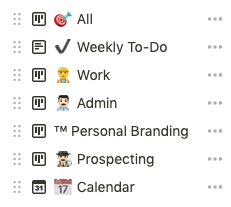
Using that logic, I created different views for my usage:
- All: all the tasks, in a Kanban view. If at any point I have too many tasks, I may choose to display them in a table or a list.
- Weekly To-Do: you already had the description, all the tasks that are planned to be achieved within the next 7 days. I also display the time to be spent on the task and the exact date I planned it.
- Work: tasks with an actual customer (not me).
- Admin: all tasks tagged with “Admin”. This view only displays tasks that are not done.
- Personal Branding: all tasks not completed and tagged with “Personal Branding”.
- Prospecting: all tasks not completed and tagged “Prospection”.
- Calendar: Calendar view. Unfortunately, the view can only display a full month. I would love to be able to change to get the week or even the day. I created the Weekly To-Do mostly because there is no Week view using the Calendar view.
Switching between the views make it easy for me to know which tasks I have to work on and how to prioritize the incoming work.

Every week, I like to plan for the following week, filling my “Weekly To-Do” view with all the tasks I want to accomplish.
💰 Accounting made easy
Generation of quotations and invoices
Now that I have tasks in my backlog responding to my customers’ requests, I can generate a quotation that will hopefully become an invoice later on.
To do so, I implemented a third table where I can easily gather all the pieces of information to make quotations:
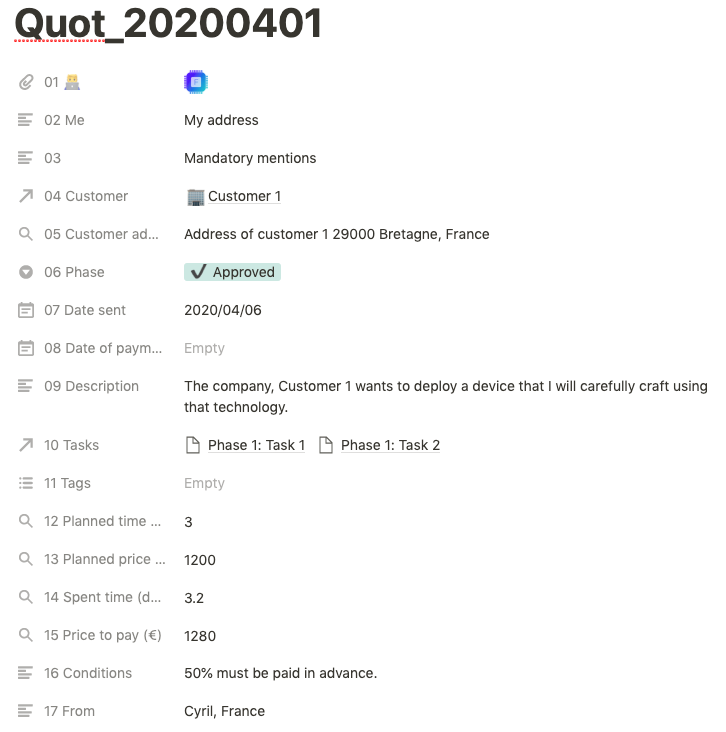
Pro tip: Use numbered fields to be able to export the table as a PDF using a defined order.
I created a template to fill the new quotation with my info (logo, address, conditions, phase set to “Quotation”). Then, to quickly edit the quotation, I can choose the customer in the list and the address will be automatically updated. Similarly, I have to add tasks taken directly for my tasks and the time planned, time spent as well as the price are all updated whenever a change occurs. The biggest task here will be to write a description for the customer to understand everything included in that quotation. I also have free space under the quotation if more information has to be added.
The document can have several phases: “Quotation”, “Approved” (project in the making), “Rejected” (you guessed it), “Invoiced” (Waiting for them to pay), “Paid” (🙏). For the invoice to be generated, I change the “Phase” from “Approved” to “Invoiced”. If the tasks have been correctly modified along the way with the time spent, the price will be reflected in the invoice. I then export the page as a PDF and it’s ready to be sent to my customer. If you want the customer to access the quotation and tasks, you could also share the page with that customer’s Notion account (hopefully your customer has an account 😉).
Financial reports
The best part is to appreciate how your efforts are being paid. 🤑
Helped with views, I can quickly get reports about the financial health of my freelance activity using my quotation/invoice database.
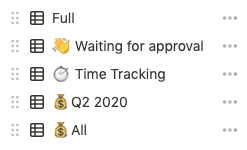
As you can see, I created a few views:
- Full: all the quotations and invoices ever created.
- Waiting for approval: quotations sent so far but never approved.
- Time tracking: here the goal is to compare planned time vs spent time globally. Am I good at planning? I think it’s a good KPI to follow.
- Q2 2020: a view for my revenues in Q2 2020. Notion can also compute the sum of a column to see how much cash I earned during that particular quarter.
- All: a simple view with all my revenues so far.
Revenues can then be easily monitored and declared every quarter in my case. Taxes are not included in any table but that can be the next step to a better accounting dashboard in Notion.
As I said, I use Notion for many other things but those simple tables, easily made, are my most used tables each day.
I hope you enjoyed reading that article.
👋